Senin, 26 November 2012

Cara Membuat Sebuah Karikatur

Oke kembali lagi dengan postingan saya tentang tutorial membuat sebuah karikatur. Tutorial ini simpel, namun juga membutuhan kejelian dan kesabaran.

Untuk bahan bisa di download disini dan disini.
Oke langsung saja masuk ke step-step membuat karikatur seperti hasil di atas.
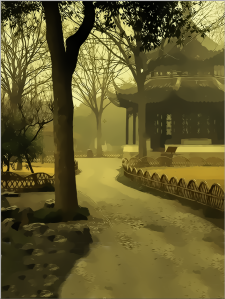
Buka Background image yang sudah di download. Drag image sehingga seperti menjadi seperti dibawah ini.

Setelah itu, gunakan Clone Stamp untuk mengisi bagian bawah yang masih kosong. untuk size 100 dan hardness 5. Gunakan Alt+klik pada bagian yang akan di clone. Lakukan seperti dibawah ini.

Untuk tutorial kali ini kembali saya menggunakan Plugin Topaz Bundle. Pada toolbar pilih filter >> topaz labs >> topaz clean 3 >> cartooned. Sehingga hasilnya akan seperti ini.
Setelah Background selesai, sekarang saatnya memproses model yang akan dijadikan bahan karikatur. Pertama, buka stok model.

Lakukan seleksi pada model. Setelah proses seleksi selesai, tekan Ctrl+Shift+I lalu delete.
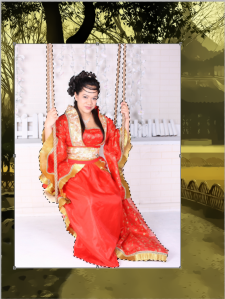
Setelah itu seleksi kembali bagian kepala dari model. Setelah terseleksi, tekan Ctrl+J untuk menduplikat bagian yang telah diseleksi. Lakukan re-size pada bagian kepala yang telah di duplikat menjadi lebih besar. Sehingga hasilnya seperti di bawah ini.

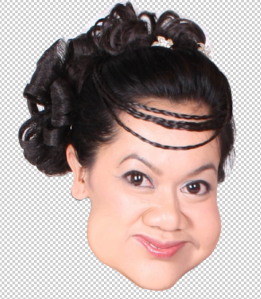
Pilih layer pada bagian kepala.  Pada toolbar pilih Filter >> Liquify. Gunakan Fordward Warp Tool untuk mengubah bentuk wajahnya, besar kecilnya sesuaikan kebutuhan. Gunakan Pucker Tool untuk mengecilkan betuk bibir. Dan gunakan Bloat Tool untuk memperbesar bagian matanya. Setelah itu klik OK, dan hasilnya akan seperti di bawah ini.
Pilih kembali pada layer tubuh. Pada toolbar pilih Filter >> Topaz Labs >> Topaz Adjust 4 >> Recovery-Highlight. Effect ini berfungsi untuk lebih menajamkan tone warna pada layer yang dipilih. Setelah itu tekan OK, dan hasilnya akan seperti ini.
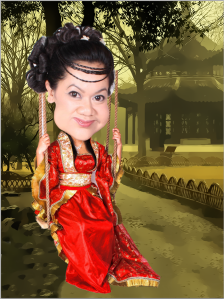
Untuk langkah selanjutnya adalah proses penghalusan kontur pada bagian baju. Untuk langkah ini saya menggunakan Smudge Tool. Untuk Smudging, gunakan ukuran Brush Size 30% Hardness 5% dan Strength 2-4.
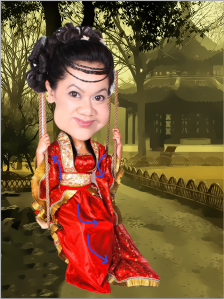
Setelah proses Smudging selesai, kembali gunakan Plugin Topaz Bundle. Pada toolbar pilih Filter >> Topaz Labs >> Topaz Clean 3 >> Curly Smooth.
Setelah itu pilih layer kepala kembali.  Pilih pada toolbar Filter >> Topaz Labs >> Topaz Adjust 4 >> Psychedelic. Setelah itu pilih Image >> Adjustment >> Color Balance.

Masuk kembali ke menu Filter >> Topaz labs >> Topaz Adjust 4 >> Detail-Simple Pop >> OK. Dan hasilnya akan seperti ini.

Lakukan Smudging pada bagian kepala sebagaimana langkah smudging pada bagian tubuh sebelumnya. Setelah proses Smudging masuk ke menu Image >> Adjustment >> Color Balance.
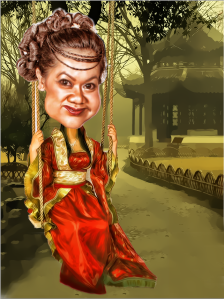

Pilih menu Filter >> Topaz Labs >> Topaz Clean 3 >> Curly Smooth. Selanjutnya kembali pada layer tubuh. Masuk juga ke menu Image >> Adjustment >> Color Balance. Dan Hasilnya akan seperti ini.

Oke proses hampir selesai. Langkah terakhir adalah proses pembuatan shadow (bayangan). Pada layer tubuh tekan Ctrl+J. Setelah itu masuk ke menu Image >> Adjustment >> Hue/Saturation. Pada field Lightness ubah menjadi 0%. Drag kebagian layer sebelumnya.
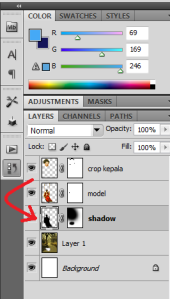
Setelah itu masuk ke menu Filter >> Blur >> Gausian Blur radius 5,7. Dan hasil akhir akan seperti ini.
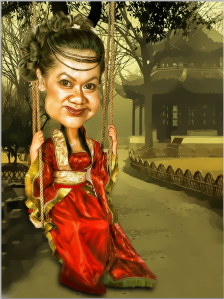
Selesai. Semoga tutorial sederhana ini bisa bermanfaat.

Rabu, 21 November 2012

Cara Memisahkan Objek dan Background pada gambar dengan Plugin Azlect


Posted by on Nov 11th, 2011 in Belajar Photoshop, Photoshop Intermediate | 3 comments

Tutorial photoshop ini sama dengan tutorial yang pernah saya buat tentang pemisahan background dengan extract bedanya kali ini menggunakan Plugin .. hehe.. lebih gampang dan cepat!
Download dulu Plugin nya di Member Area..  atau yang belum jadi member silahkan cari di google.. ada kok kalo jeli. :D
Cara install nya ada juga kok.. jadi download, Install trus pake :)
Buka gambar yang mau diedit.. saya pake gambar Steven Gerrard .. Gelandang hebat liverpool itu loh ! hehehe
steven gerrard
Duplikat layer background dengan menekan CTRL + J

Sekarang buka Plugin Ezlect nya di Filter > Ezlect > Ezlect extract

Ini Jendela Ezlect nya , toolnya cuman dikit kok jadi mudah dipelajari
steven gerrard
Klik Di Object nya ( Steven Gerrard nya)  dengan Penanda Object dan Klik di background oleh penanda background.. penampakannya kayak gini nih
steven gerrard
Penanda Objek ditandai dengan gambar kotak kecil kalo penanda background ditandai dengan tanda x
Klik Show mask Image untuk melihat hasilnya… kalo kurang bagus bisa dicoba .. klik lagi Show selection edge (letaknya disamping show mask image)
( tool lain nya di dalam ezlect silahkan di pelajari sendiri .. gampang banget kok)
Kalo sudah beres klik Ok ..

background di layer 1 sudah hilang…
Ini sebenernya sudah beres pekerjaan plugin Azlect..
Sekarang tinggal menggunakan gambar hasil pemisahan background tersebut.. terserah mau diapain.. hehehe
steven gerrard
Saya beri background aja deh yaa sebagai contoh nya…
buat layer baru di bawah layer 1
terus warnai dengan warna merah

Sekarang klik 2x layer 1 untuk memunculkan Blending Options

Klik Ok…
Beri text atau gambar tambahan … jadinya seperti ini :
steven gerrard
Selamat Mencoba !


Selasa, 20 November 2012

Ghostly Text Effect

This tutorial will show you how to combine different layer effects with the gaussian blur filter to create a simple hazy ghostly text effect.
The Final Result:
Notes:
* the software used in this tutorial is Adobe Photoshop CS6, but you can use CS3+ versions as well.
* you might want to check the Basix Page to see some useful topics on dealing with Photoshop basics, such as loading palettes and some shortcuts.
Resources:
* Stock Stormy Clouds by minifoot.
* Lightning Brushes by DianazDesignz.
Note: You might need to load the Contours used in the tutorial, so check this image to see how to do so.
Step 1
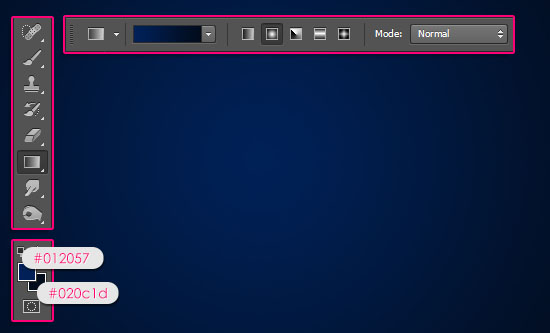
- Create a 1152 x 846 px document, set the Foreground color to #012057 and the Background color to #020c1d. Pick the Gradient Tool, click the Radial Gradient icon in the Options bar, then click and drag from the center of the document to one of the corners.
Ghostly Text Effect step 1
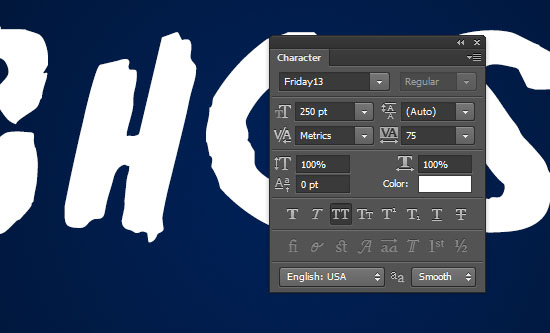
- Create the text in white using the font Friday 13. The font size is 250 pt and the Tracking value is set to 75 to avoid overlapping of the glowing edges.
Ghostly Text Effect step 1
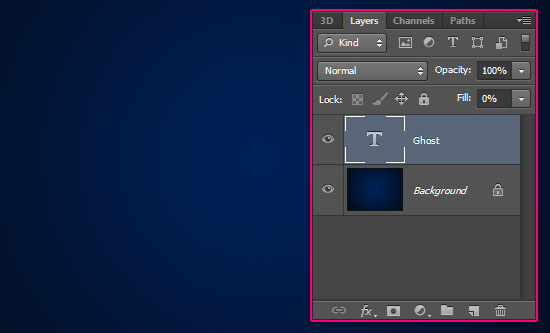
- Change the text layer’s Fill value to 0.
Ghostly Text Effect step 1
Step 2
Double click the text layer to apply the following Layer Style:
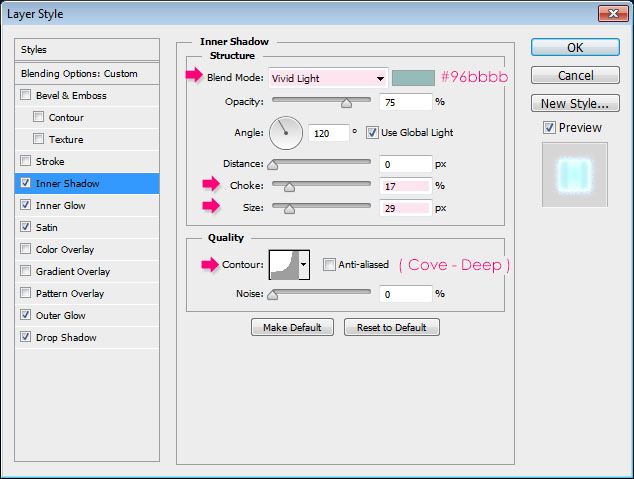
- Inner Shadow: Change the Blend Mode to Vivid Light, the color to #96bbbb, the Choke to 17, the Size to 29, and the Contour to Cove-Deep.
Ghostly Text Effect step 2
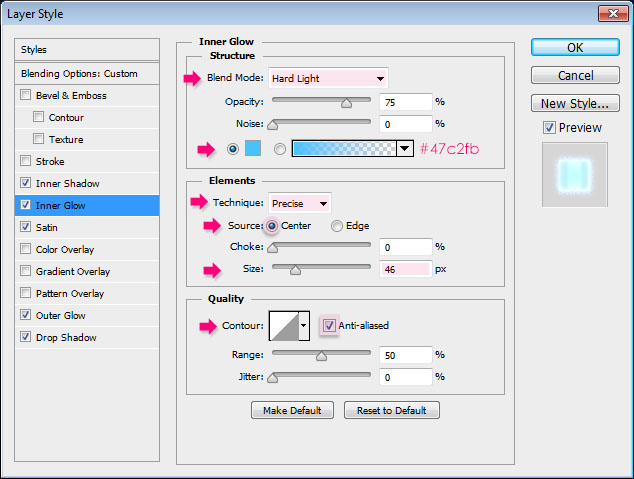
- Inner Glow: Change the Blend Mode to Hard Light, the color to #47c2fb, the Technique to Precise, the Source to Center, the Size to 46, and check the Anti-aliased box.
Ghostly Text Effect step 2
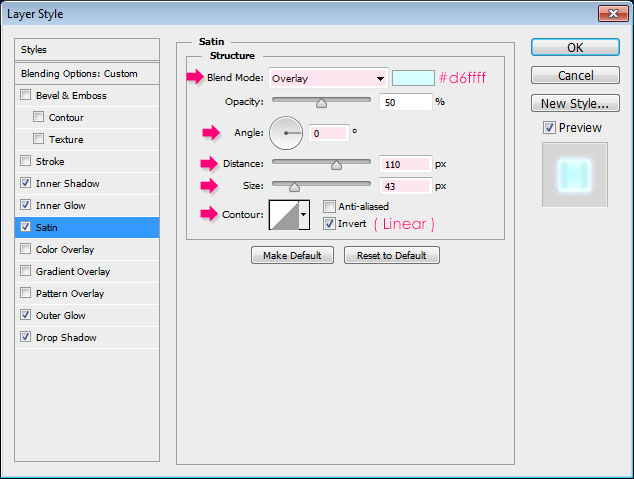
- Satin: Change the Blend Mode to Overlay, the color to #d6ffff, the Angle to 0, the Distance to 110, the Size to 43, and the Contour to Linear.
Ghostly Text Effect step 2
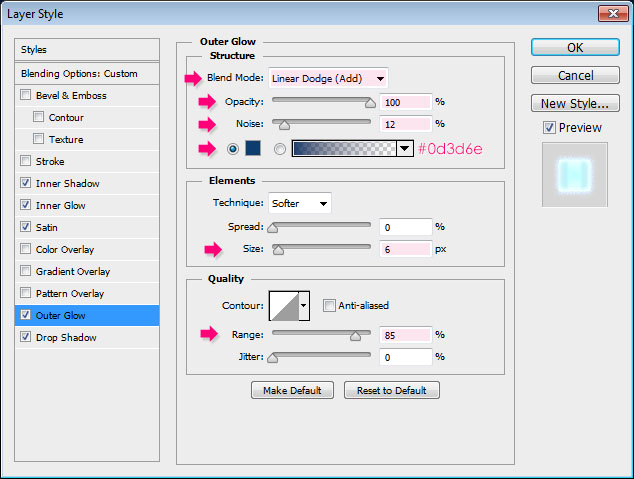
- Outer Glow: Change the Blend Mode to Linear Dodge (Add), the Opacity to 100%, the Noise to 12, the color to #0d3d6e, the Size to 6, and the Range to 85.
Ghostly Text Effect step 2
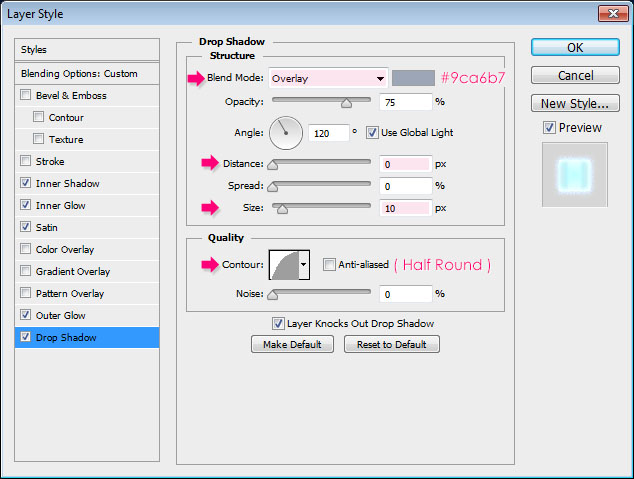
- Drop Shadow: Change the Blend Mode to Overlay, the color to #9ca6b7, the Distance to 0, the Size to 10, and the Contour to Half Round.
Ghostly Text Effect step 2
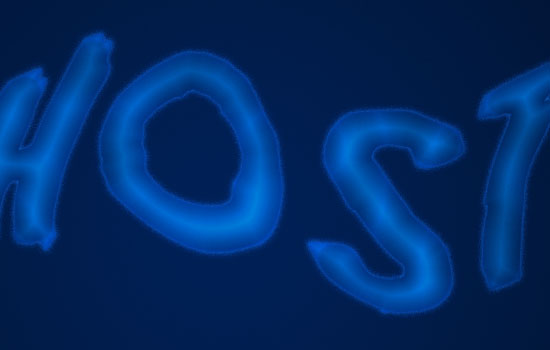
This will create a glowing hazy effect. Notice that we modified the Blend Mode and color values for the Satin and Shadow effects to use them as Glow effects, in order to intensify the brightness of the different parts of the text.
Ghostly Text Effect step 2
Step 3
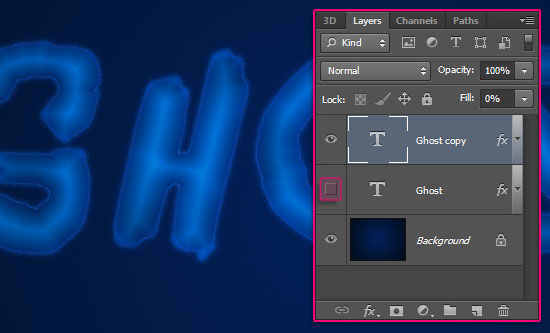
- Duplicate the text layer then make the original invisible by clicking the eye icon next to it.
Ghostly Text Effect step 3
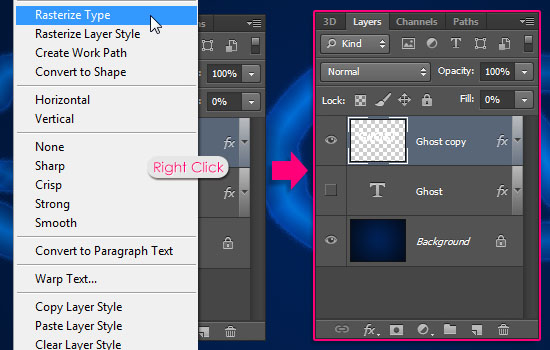
- Right click the copy text layer then choose Rasterize Type. This will convert the Type layer into a rasterized layer, in which you can’t modify the text.
We need to rasterize the layer in order to apply Filters to its content. That’s why we kept the original text layer and made it invisible, so that we can modify it easily if we want to edit the text.
Ghostly Text Effect step 3
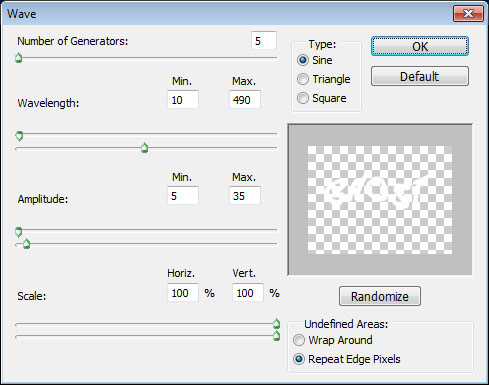
- Go to Filter -> Distort -> Wave, and type in the values below. The Wavelength Max. value controls how “wavy” the text looks, with lower values resulting in a wavier effect. So you can play around with the values if you like.
Ghostly Text Effect step 3
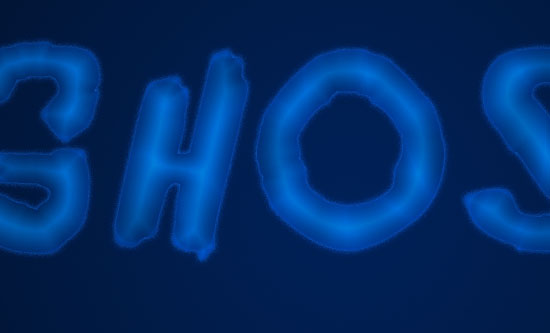
- You should get a glowing wavy effect now.
Ghostly Text Effect step 3
Step 4
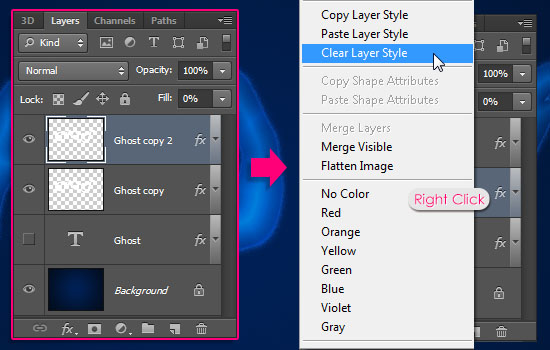
- Duplicate the rasterized wavy text layer then right click the original one and choose Clear Layer Style to get rid of any effects.
Ghostly Text Effect step 4
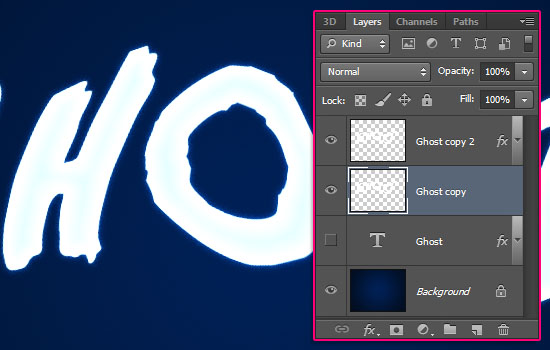
- We will use this layer to make the edges more hazy.
Ghostly Text Effect step 4
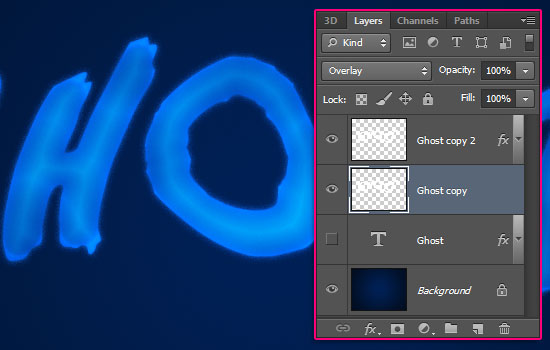
- Change the un-styled text layer’s Blend Mode to Overlay.
Ghostly Text Effect step 4
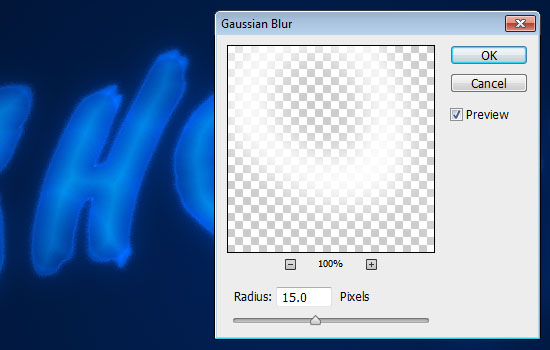
- Go to Filter -> Blue -> Gaussian Blur, and change the Radius to 15. Bigger values will create hazier edges, while lower ones will create a more defined glow. Try different values until you like the result.
Ghostly Text Effect step 4
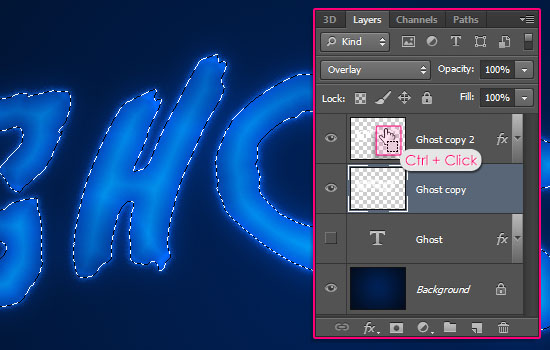
- Ctrl + Click the styled layer’s thumbnail to create a selection.
Ghostly Text Effect step 4
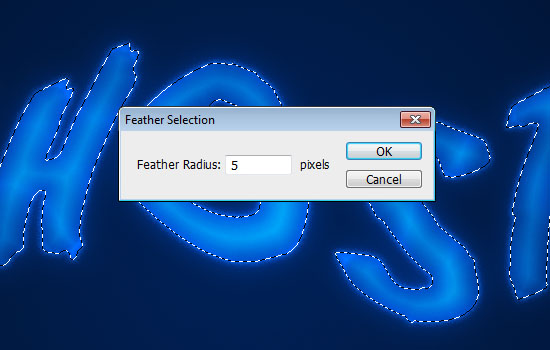
- Go to Select -> Modify -> Feather, and set the Feather Radius to 5. This will make the selection smoother.
Ghostly Text Effect step 4
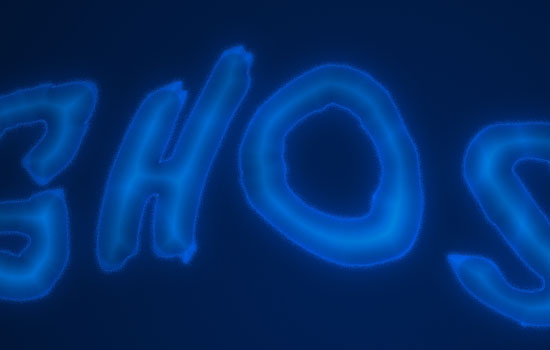
- Make sure that the blurred text layer is the active (selected) one, then hit the Delete key to get rid of the inner parts. Go to Select -> Deselect (or press Ctrl + D) to get rid of the selection.
Ghostly Text Effect step 4
Step 5
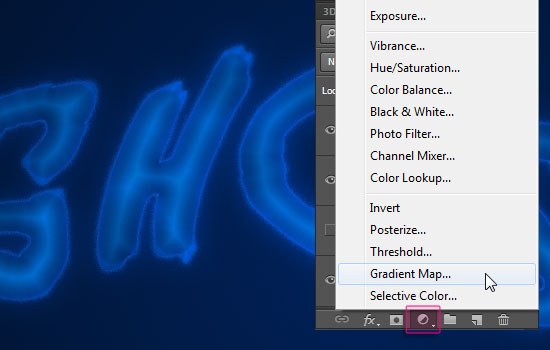
- Click the ‘Create new fill or adjustment layer’ icon down the Layers panel and choose Gradient Map.
Ghostly Text Effect step 5
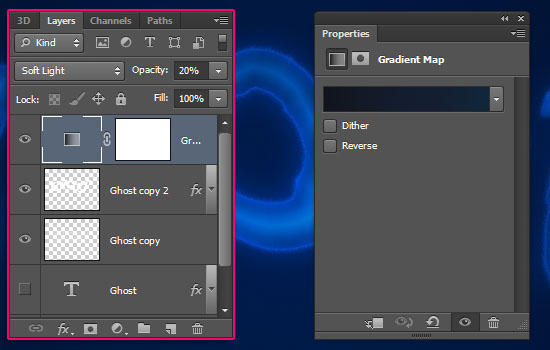
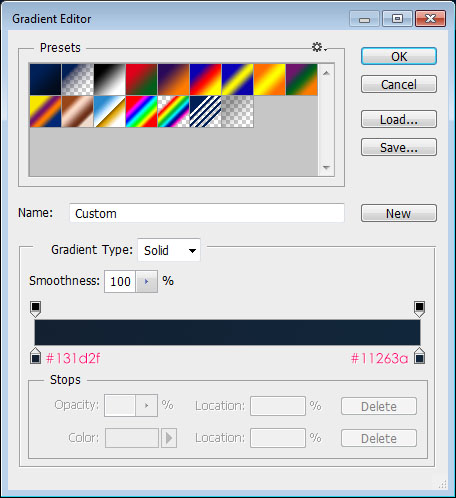
- Place the adjustment layer on top of all layers then change its Blend Mode to Soft Light and its Opacity to 20%, then click the Gradient box to create the gradient used.
Ghostly Text Effect step 5
- The gradient uses two colors, #131d2f to the left, and #11263a to the right.
Ghostly Text Effect step 5
Step 6
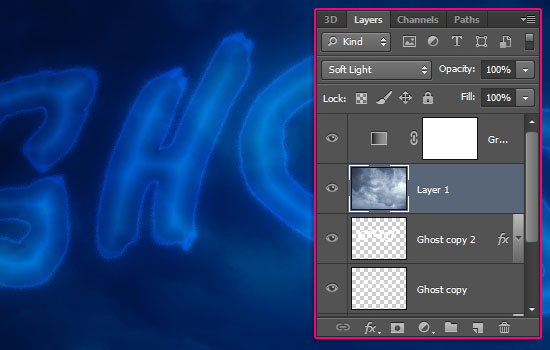
- Place the Stock Stormy Clouds image right below the adjustment layer, resize it as needed, then change its layer’s Blend Mode to Soft Light.
Ghostly Text Effect step 6
- Create a new layer right below the two rasterized text layers, call it “Lightning”, then change its Blend Mode to Overlay.
Pick the Brush Tool and set the Foreground color to #ebebeb.
Ghostly Text Effect step 6
- Add some of the Lightning Brushes around the text.
Ghostly Text Effect step 6
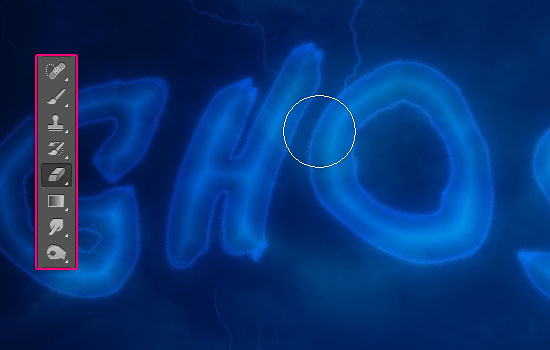
- You can finally use the Eraser Tool to remove any unwanted parts of the lightning.
Ghostly Text Effect step 6
And there you have your glowing ghostly text effect ready!
If you enjoyed the post, feel free to subscribe to our RSS feed and follow us on Twitter as well.